In your journey towards heightened productivity with ClickUp, understanding the intricacies of the platform’s automation features is imperative. The forthcoming tutorial, provided by Boss Mode Marketing, offers a concise yet thorough walkthrough on setting up ClickUp Automations. By leveraging these powerful tools, you will master the art of constructing Triggers, streamlining complex tasks, and instituting seamless integrations with other applications. The usage of Automations is poised to significantly decrease manual workload, thereby optimizing your workflow and punctuating your focus on the pivotal aspects of project management.
![]()
This review explains the mechanisms behind Automations, encompassing the establishment of Triggers to initiate automated Actions and the application of Conditions that guide these processes. Your understanding will increase as you navigate through the Automation library’s extensive template collection, or when you elect to create bespoke Automations tailored to your unique project needs. Embracing these foundational components will undoubtedly segue to significant time savings and an overall enhancement of your team’s productivity.

Understanding ClickUp Automations
What are ClickUp Automations?
ClickUp Automations are powerful features within the ClickUp project management platform that enable you to streamline repetitive tasks and processes. They work by allowing you to set up rules that trigger specific actions within your projects and tasks. Automations can help you create dynamic workflows that react to changes or criteria, making project management more efficient and less prone to error.
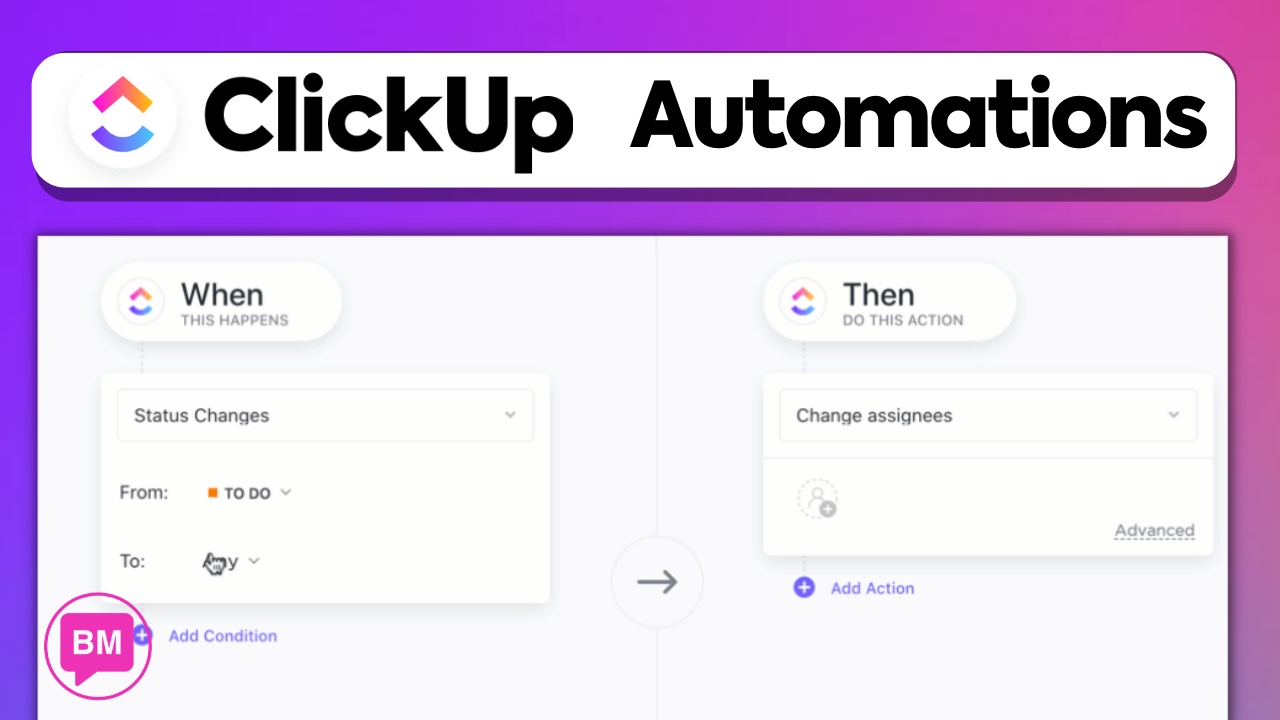
The Role of Triggers, Conditions, and Actions
The foundation of ClickUp automations lies in three main components: Triggers, Conditions, and Actions. Triggers are events that initiate an automation, for instance, when a task’s status is updated. Conditions are specifications that must be met for the automation to proceed, like a task reaching a particular due date. Actions are the automated responses performed when triggers and conditions are met, such as notifying a team member or changing a task’s priority. Together, these elements form an automation sequence that operates autonomously once set up.
Benefits of Using Automations
Embracing ClickUp Automations can bring numerous advantages. It reduces time spent on repetitive tasks, allowing you and your team to concentrate on more significant, strategic work. Automations can also minimize the risk of human error, ensure consistency across tasks and projects, improve team communication, and ultimately boost productivity. With automations, you can create a more agile and responsive working environment that adapts quickly to changing priorities.
Getting Started with ClickUp Automations
Accessing Automations in Your Workspace
To start using ClickUp Automations, you’ll need to access them within your ClickUp workspace. Look for the “Automate” button at the top of your screen within a folder or list. Clicking on this will open the Automation menu where you can see existing automations or create new ones.
Navigating the Automations Interface
The Automations interface is user-friendly and intuitive. Once you are in the Automations menu, you can browse through a library of automation templates or choose to create a custom automation. The interface allows you to view active automations, see how many times they’ve run, and manage your automation settings.
Understanding Automation Permissions
It’s important to note that not everyone may have the same level of access to create or manage automations. Depending on your ClickUp plan and workspace permissions, you might be limited in how many automations you can create or which types of automations you can use. Ensure that you have the appropriate permissions or seek assistance from an admin if you encounter limitations.


Creating Your First ClickUp Automation
Selecting a Trigger for Your Automation
Your first step in creating an automation is to choose a trigger. Decide what event will set your automation in motion. It could be when a task is created, when a comment is made, or when a specific field is updated.
Defining Conditions for Execution
After selecting a trigger, you may need to define conditions that must be met for the automation to execute. For example, you might specify that a task’s status must be ‘In Progress’ or that the assignee must be a certain team member.
Configuring the Action to be Performed
Finally, choose the action that will happen when your trigger and conditions align. This could range from changing a task status, sending a notification, creating a subtask, or updating a custom field. Once you have configured these settings, you can save your automation and it will become active in your workspace.

Automation Use Cases
Status Change Notifications
One common use case for automations is to set up notifications when the status of a task changes. This ensures that team members are alerted instantly to progress changes, keeping everyone in the loop and proactive in their roles.
Automatic Task Prioritization
ClickUp Automations can also automatically adjust the priority of tasks based on certain triggers. For instance, as a due date approaches, you might increase a task’s priority to ensure it gets the attention it requires.
Due Date Reminders
You can set automations to send reminders as task due dates approach. This helps prevent work from falling through the cracks and ensures that deadlines are consistently met.

Custom Automations vs. Pre-built Templates
When to Use Custom Automations
Custom automations are ideal when you have specific workflow requirements that aren’t met by the existing templates. They offer flexibility and can be precisely tailored to fit the unique processes of your team or organization.
Leveraging Pre-built Automation Templates
Pre-built templates are ready-made automations ClickUp provides to cover common scenarios. They are a great starting point, especially if you are new to automations or when you want to implement a standard workflow quickly.
Creating Custom Automation from Scratch
To create a custom automation from scratch, you would navigate to the Automations menu and begin by defining your trigger, conditions, and actions from the endless possible combinations. While more time-consuming initially, this approach enables you to construct highly tailored automations for niche requirements.
Managing and Organizing Automations
Editing Existing Automations
Over time, you might need to make adjustments to your automations. You can edit existing automations by finding them in the Automations menu and clicking on the corresponding “Edit” link. Changes could include modifying triggers, conditions, or actions.
Enabling and Disabling Automations
You can toggle automations on or off as needed without deleting them. This feature is particularly useful for temporary or seasonal workflows that you might want to reactivate in the future.
Organizing Automations for Efficiency
Maintain organization by naming your automations clearly and grouping them logically. This practice makes it easier to manage multiple automations and to identify them for editing or troubleshooting.

Best Practices for Creating Effective Automations
Keeping Automations Simple and Clear
Despite the temptation to automate as much as possible, it’s often best to keep automations simple. Overly complex automations can become difficult to manage and may lead to unexpected outcomes.
Ensuring Automations Do Not Conflict
Be mindful that automations can sometimes conflict with one another, causing undesirable effects. Ensure that you review and plan your automations to avoid overlaps that might trigger incorrect actions.
Regular Review and Maintenance of Automations
Regularly review your automations to ensure they continue to serve their intended purpose. Adjust them as needed to align with any changes in team structure, workflow, or project scope.
Integrating Automations with External Apps
Overview of ClickUp Integrations
ClickUp offers integration with various external apps, allowing you to streamline workflows that span across different platforms. These integrations broaden the scope and impact of your automations.
Setting Up Automations with External Tools
Integrating external tools often requires setting up additional automations within ClickUp. You’ll need to configure triggers and actions that communicate between ClickUp and the third-party tool, streamlining operations without manual intervention.
Use Cases for External Integrations
Externally integrated automations can simplify several processes such as syncing with calendar apps for scheduling, pushing code updates with GitHub, or managing customer inquiries with CRM software.

Troubleshooting ClickUp Automations
Common Issues and Their Solutions
As you use automations, you may encounter issues such as automations not running or producing unexpected results. Often, these can be resolved by checking the trigger and condition settings, ensuring permissions are correct, or confirming that there are no conflicting automations.
Where to Find Help and Resources
For further assistance, refer to ClickUp’s help documentation and community forums. These resources can offer guidance and solutions to common automation problems.
Fine-tuning Automations for Best Performance
Sometimes, automations require fine-tuning for optimal performance. Monitor automation logs, note any consistent errors or roadblocks, and refine your settings accordingly to achieve the best results.
Conclusion
Recap of ClickUp Automations Benefits
ClickUp Automations serve to enhance productivity, consistency, and efficiency in your workflow. By automating routine tasks, ClickUp helps reduce manual efforts, enabling you and your team to focus on higher-value work. See out ClickUp Review post.
Final Thoughts on Optimizing Workflow with Automations
Utilizing ClickUp Automations is a testament to the evolution of project management towards smarter, technology-driven processes. As you gain familiarity with automations, you will discover countless ways to streamline and improve your daily operations.
Encouragement to Explore and Test Automations
Lastly, don’t hesitate to explore and experiment with ClickUp Automations. Testing various automations can lead to discovering innovative solutions that could significantly improve your workflow and operations.


