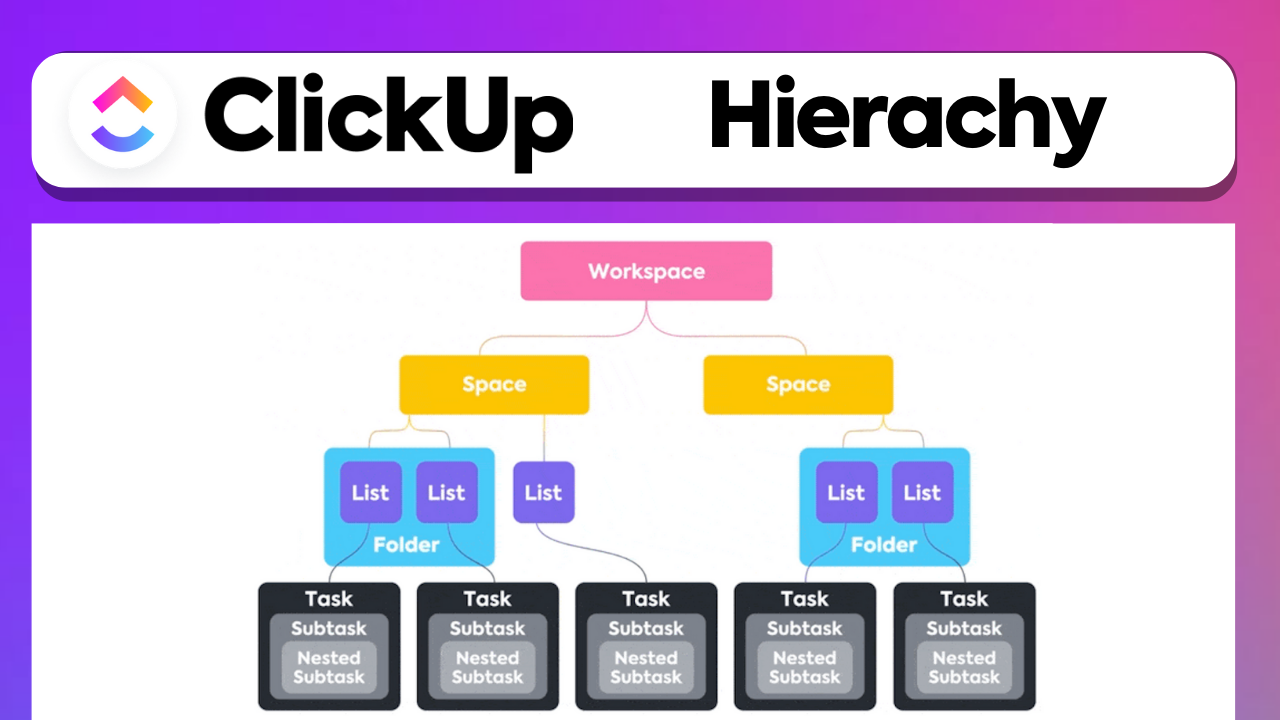
As you embark on the journey to streamline your project management processes, the “CLICKUP HIERARCHY Explained – CLICKUP Tutorial” will serve as your guide to mastering the organizational framework of ClickUp. Presented by Boss Mode Marketing, this tutorial is designed to dissect the ClickUp hierarchy, enabling you to leverage the full potential of managing and categorizing projects. You will gain insights into the inner workings of ClickUp Workspaces, Spaces, Lists, Folders, Tasks, and Subtasks, which are pivotal in facilitating a collaborative environment for your team’s operations.
The tutorial meticulously unpacks each element of the ClickUp hierarchy, providing clarity on how to optimize the platform for your project needs. From setting up your initial workspace—a foundational step in your ClickUp setup—to intricately managing tasks and subtasks within lists and folders, you will attain the knowledge to efficiently organize work into manageable, actionable items. Embrace a new level of productivity and collaboration as you familiarize yourself with the systematic approach that ClickUp offers to project management.
Understanding ClickUp Hierarchy
What is ClickUp Hierarchy?
ClickUp Hierarchy is a structured approach that allows you to organize your tasks and projects within the ClickUp platform effectively. As a task management and project planning tool, ClickUp uses a tiered hierarchy which is essential for keeping your projects and tasks in order, ensuring nothing slips through the cracks. The hierarchy begins at the highest level with Workspaces and progressively breaks down into Spaces, Folders, Lists, Tasks, and Subtasks.
The Importance of Keeping an Organized Structure
Maintaining an organized structure within ClickUp is crucial for several reasons. First, it enables you to locate information quickly. Second, it ensures that everyone on your team understands their responsibilities and the context of their tasks. Third, an organized ClickUp hierarchy supports scalability; it accommodates the complexities that come with larger teams and more significant projects.
How the Hierarchy Enhances Project Management
The hierarchy within ClickUp enhances project management by segmenting work into manageable units. Workspaces encapsulate your entire organizational project portfolio, while Spaces allow you to categorize different departments or major project areas. Folders and Lists provide a means to break down projects into smaller stages and tasks, which are the actionable items assigned to team members. With this structured approach, you can track progress more effectively and manage projects proactively.
Setting Up Your Workspace
Creating a New Workspace
To begin with ClickUp, you’ll need to create a Workspace, which serves as your central hub for all projects and tasks. You can create a workspace for your entire organization or for specific areas of your business.
Workspace Structure and Privacy Settings
When creating Workspaces, you have control over the structure and privacy settings. You can structure your Workspace to reflect your organizational layout and determine whether it should be private to certain members or visible to your entire team. Deciding on the right privacy and sharing settings is integral, as it affects data access and collaboration across the team.
Navigating Between Multiple Workspaces
If you are part of multiple Workspaces, navigating between them should be seamless. It’s essential to understand how to switch contexts without disrupting your workflow. You have the flexibility to work across various Workspaces, keep them separate, and organize them effectively.
Managing Spaces Within ClickUp
Creating and Naming Spaces
Within a Workspace, you create Spaces to represent different teams, projects, or areas of operation. When creating and naming Spaces, you should aim for clarity and relevance to ensure team members recognize and engage with the appropriate area.
Using Space Templates for Efficiency
ClickUp offers Space templates that provide predefined structures for various project types. By using these templates, you can set up your Spaces efficiently, ensuring consistency and saving time.
Best Practices for Space Management
The best practices for Space management include maintaining a consistent naming convention, utilizing Space templates to quick-start your setup, and adjusting Space settings to match your team’s needs and preferences. Regularly reviewing your Space configuration ensures it remains aligned with the team’s evolving project management requirements.
Folders and Lists: Organizing Your Projects
The Role of Folders in the Hierarchy
Folders in ClickUp help you divide your Space into smaller, more manageable segments, typically representing different projects or phases within a Space. They play a pivotal role in keeping your Lists and Tasks organized.
Creating Lists for Task Management
Lists are where you manage your actual tasks. Each List can be aligned with a project phase or a type of work, like sprints, milestones, or categories. When creating Lists, think about how you can best categorize tasks for maximum clarity.
How to Effectively Utilize Folders and Lists
Folders and Lists must be used effectively to manage projects successfully. This involves periodic reviews to restructure or rename them as needed and ensuring that tasks are appropriately categorized for ease of access and tracking.
Creating and Assigning Tasks
Adding New Tasks to Lists
Adding new tasks to your Lists is a fundamental step in project management. When doing so, provide concise titles, clear descriptions, and attach any necessary files to provide context.
Setting Due Dates and Priorities
Each task should have a due date to keep the project on schedule. Additionally, setting priorities helps team members understand the task’s importance relative to others.
Assigning Tasks to Team Members
You are in charge of assigning tasks to the right team members. This involves considering each member’s workload and expertise. Ensuring proper assignment increases accountability and the likelihood of successful task completion.
Understanding and Utilizing Subtasks
Breaking Down Tasks into Subtasks
Complex tasks can be broken down into smaller, more manageable Subtasks within ClickUp. This makes the overarching task less daunting and easier to tackle.
Assigning Subtasks and Tracking Progress
Each Subtask can be assigned to different team members, allowing for a collaborative approach to handling multifaceted tasks. By tracking the progress of Subtasks, you receive a clearer picture of the overall task completion rate.
The Relation Between Tasks and Subtasks
The relationship between Tasks and Subtasks should reflect the actual workflow of the task objective. Subtasks nest within parent tasks, providing a straightforward view of what needs to be accomplished for the parent task to be marked as complete.
ClickUp Views for Project Management
Working with List View
List View offers a traditional, line-by-line presentation of tasks and subtasks, ideal for those who prefer a simplified, straightforward view for managing their work.
Advantages of Board View
Board View in ClickUp presents tasks in a Kanban-style board, enabling you to visualize workflow stages. This view is particularly beneficial for managing Agile projects and tracking the flow of tasks.
Choosing the Right Views for Your Team
Selecting the right views for your team is crucial in enhancing productivity. You should consider your team’s project management methodology and personal preferences when deciding between List, Board, Calendar, or other available views in ClickUp.
Utilizing ClickUp for Team Communication
In-app Messaging and Commenting Features
ClickUp’s in-app messaging and commenting features facilitate seamless communication within your team. You can comment on tasks for clarity, updates, or feedback, making sure everyone is on the same page.
Shared Views for Collaborative Work
Shared Views allow team members to see the same layout and status of tasks, fostering a collaborative environment. This ensures transparency and collective understanding of the project’s progress.
Tagging and Notification Techniques
Effective use of tagging in ClickUp can alert team members to updates relevant to them. Understanding notification settings is also important to ensure that your team does not miss crucial information.
Implementing ClickUp Automations
Setting Up Basic Automations
ClickUp allows you to set up basic automations that can take care of repetitive tasks, such as changing statuses, assigning tasks, and sending notifications – thus streamlining your processes.
Automation Recipes for Common Tasks
ClickUp offers a variety of automation ‘recipes’ for common tasks that can be easily implemented into your workflow. These preconfigured automations can increase efficiency and reduce the likelihood of human error.
Managing and Troubleshooting Automations
When managing automations, it’s essential to monitor their effectiveness and modify them as necessary. If automations aren’t performing as intended, troubleshooting will be required to ensure they align with your intended workflows.
Conclusion
Recap of ClickUp Hierarchy and Usage
You’ve been walked through the ClickUp hierarchy from Workspaces down to Subtasks, and now understand how each level contributes to a cohesive project management system. Proper utilization of each tier in the hierarchy enables efficient task and project management.
Final Thoughts on Optimizing Workflows
As you continue to use ClickUp, it’s vital to optimize your workflows continually. Adjust structures, refine processes, and incorporate feedback from your team to improve productivity and effectiveness.
Encouragement to Explore ClickUp Further
It is highly recommended that you explore ClickUp further. The platform is rich with features that can enhance your project management experience. By fully embracing ClickUp’s capabilities, you can transform the way you manage projects and collaborate with your team.


